A consolidated single-page reference for running Windows games, emulation, and tweaks on Steam Deck.
Updated: 2025-12-15
Info About Steam Deck
Game Mode
Game Mode is essentially an overlay running Big Picture Mode, allowing you to access the Quick Access Menu and the Steam Menu and control everything in one easy to use interface. This is the preferred method to play games as it allows you to set hardware limits, change settings on the fly, enable a fps counter, and many other things on the fly. This is what the Deck boots into by default.
Desktop Mode
Desktop Mode is what Game Mode is installed over. It is the real computer behind everything. Built on Arch Linux with KDE Desktop Environment. It can be accessed through Game Mode by opening the Steam Menu and clicking Power > Switch to Desktop.
Wine
Wine (originally an acronym for “Wine Is Not an Emulator”) is a compatibility layer capable of running Windows applications on several POSIX-compliant operating systems, such as Linux, macOS, & BSD. Instead of simulating internal Windows logic like a virtual machine or emulator, Wine translates Windows API calls into POSIX calls on-the-fly, eliminating the performance and memory penalties of other methods and allowing you to cleanly integrate Windows applications into your desktop.
from WineHQ
To simplify: Wine Makes Linux run Windows apps
Proton
Proton is a compatibility layer for Windows games to run on Linux-based operating systems. Proton is developed by Valve in cooperation with developers from CodeWeavers. It is a collection of software and libraries combined with a patched version of Wine to improve performance and compatibility with Windows games. Proton is designed for integration into the Steam client as “Steam Play”. It is officially distributed through the client, although third-party forks can be manually installed. Proton incorporates several libraries that improve 3D performance. These include Direct3D-to-Vulkan translation layers, namely DXVK for Direct3D 9, 10 and 11, and VKD3D-Proton for Direct3D 12.
from Wikipedia
There are two different Proton iterations right now:
Steam’s Official Proton
This is what comes baked into the system more or less. These are selectable by going into the game Properties and clicking the Compatibility tab. From there you’ll click the checkbox next to “Force the use of a specific Steam Play compatibility tool”. Here you will be able to select any Proton available through steam as well as any others you have installed. Sometimes different games work with different Proton versions. More often than not Proton Experimental is the most up to date and has the best compatibility rate. All games are different, some may not have working sound unless you go to an old version. Mess with this first if you have issues running games.
GE-Proton
GE Proton (or Glorious Eggroll Proton) is an open source variant of Steams Proton that is user developed and maintained. It usually has faster support for games and also includes additional features and fixes, some which Steam can’t include for licensing reasons. It’s usually installed through ProtonUpQt, and can be selected the same as any other Proton version once installed, in the compatibility section of any game’s properties.
Prefixes
A (Wine/Proton) prefix is what makes Proton able to run a Windows app on Linux “natively”. Inside of any prefix you’ll usually find a series of folders and files, one being drive_c. The reason for all of this is the folder structure and other dependencies and files emulates a Windows environment. Essentially a prefix pretends to be a Windows hard drive, pretends Windows is installed on it, and translates Linux commands/operations into Windows specific versions. This combined with Wine/Proton are the most major components of playing a Windows game on a Linux device.
Launchers
Launchers are apps built for Linux that allow you to play games from other Launcher based game companies. Heroic, Bottles, and Lutris are the mainly discussed ones. These add a few more things some games may need to run efficiently or properly at all. While these are a preferred method for ease of use, keep in mind this is another layer between your game and SteamOS so at times troubleshooting it may be a little more difficult. These also usually come with Wine configuration, login support for launchers, the option to add shortcuts to Steam, and a whole slew of other features allowing you to do less tinkering and kind of just get going.
Decky Loader
Warning: Decky Loader is a third-party plugin loader for the Steam Deck. It allows you to add custom features and tweaks to your Deck, but it has been known to break after SteamOS or plugin updates. Support for Decky Loader is not offered here. Use at your own risk.
Installing Decky Loader
- Go to the Decky Loader GitHub and follow the installation instructions for your Steam Deck.
- After installation, Decky will appear as a plug icon in the Steam Deck’s quick access menu.
- You can browse and install plugins directly from the Decky interface.
Disabling or Uninstalling Decky Loader
- Open the Decky menu (plug icon).
- Use the settings or options menu to disable or uninstall Decky Loader or any installed plugins.
If you experience issues with games or SteamOS after installing Decky Loader or plugins, try disabling or uninstalling Decky Loader first.
Commonly Used Apps
Note: Items in Italics are available on the Discover Store.
| Name/Link | Description |
|---|---|
| ProtonUpQt | This allows you to install unofficial Proton versions for Steam, Lutris, and other specialty situations. Highly recommended whether you’re sailing the seas or not. |
| Flatseal | Use this app to give extra permission to Flatpak apps. Flatpak is the method of installation used when you download apps in Discover. Most often in this scenario you would use this to allow an app to see all of the filesystem (if your other drives or folders aren’t showing in an app like Lutris, this is how you would make it available). |
| ProtonTricks | Similar to WineTricks, this allows you to manipulate the prefixes for your individual Windows based games. You can install dependencies, set the prefix up to use DLL files (for mods), set the Windows versions compatibility, install game updates or other exe files, and so much more. This is like the control panel in Windows for each individual games prefix. This is also where you can find the compatdata folder number for any non steam games you have installed (if you installed through steam). The folder number will be in parentheses next to whatever the entry is titled in steam. |
| Bottles/Lutris/Heroic Launcher | These are the launchers that are mentioned in the previous section. Bottles, Lutris, and Heroic have varied access to the stupid launchers all AAA publishers insist on using. Thing of these as mega launcher that allows you to organize and work with a multitude of launcher-based games without having to jump from launcher to launcher. These can all be found on the discover store. |
| EmuDeck/RetroDeck | If it isn’t obvious from the name, these are the most commonly recommended methods of playing emulators and retro games. The advantages of these methods rather than setting up every emulator individually are: better folder structure, custom settings tailored to the Deck itself, a frontend that brings everything into view easily, and a bunch of other included tools that make getting on the road to emulation a lot easier. There is a larger section about emulation below. |
| Warpinator | Warpinator is a recommended file transfer service for your local network. This application works with all OS options. It will need to be running on both your Steam Deck and the device you are transferring files from/to. For Windows there are two options, unofficial Warpinator, or Winpinator. I have personally had more luck with the actual Warpinator. Sometimes if there are connection issues it is best to manually set the network device in settings. This is the fastest and easiest to set up method for transferring files. |
| JDownloader | A download manager that I myself swear by. It can handle multi part links, fill captchas for you, store account info for sites you have a login with, and it usually finds the highest speed it can. Any type of DL link works here for the most part. It is recommend downloading one or two files at a time through settings so you can maximize speed. |
| qBittorrent | For downloading torrents. |
| AnyDesk/RustDesk | These are Remote Desktop applications. Use this to access your desktop mode from another PC or Device that can install these apps. This is great in the absence of a keyboard and mouse, you can also send files to yourself (albeit small ones). This is really useful also if you don’t wanna keep switching between monitor inputs while docked, etc. If you want real ease of use be sure to set up unattended access with a password for the remote app so you don’t have to use the Deck to accept every session. |
| PeaZip | Application for handling compressed files. This includes .rar, .7z, .zip, etc. This is especially useful for multipart zip files (repacks/large games) as Dolphin seems to have issues with them. Open PeaZip, click Open, find where your multipart compressed files are, and select one. It should open all of the data inside the window, then click extract and make sure you extract to a place you can find easily! |
Caution: Do not use BitTorrent or uTorrent as they have been known to be shady in the past.
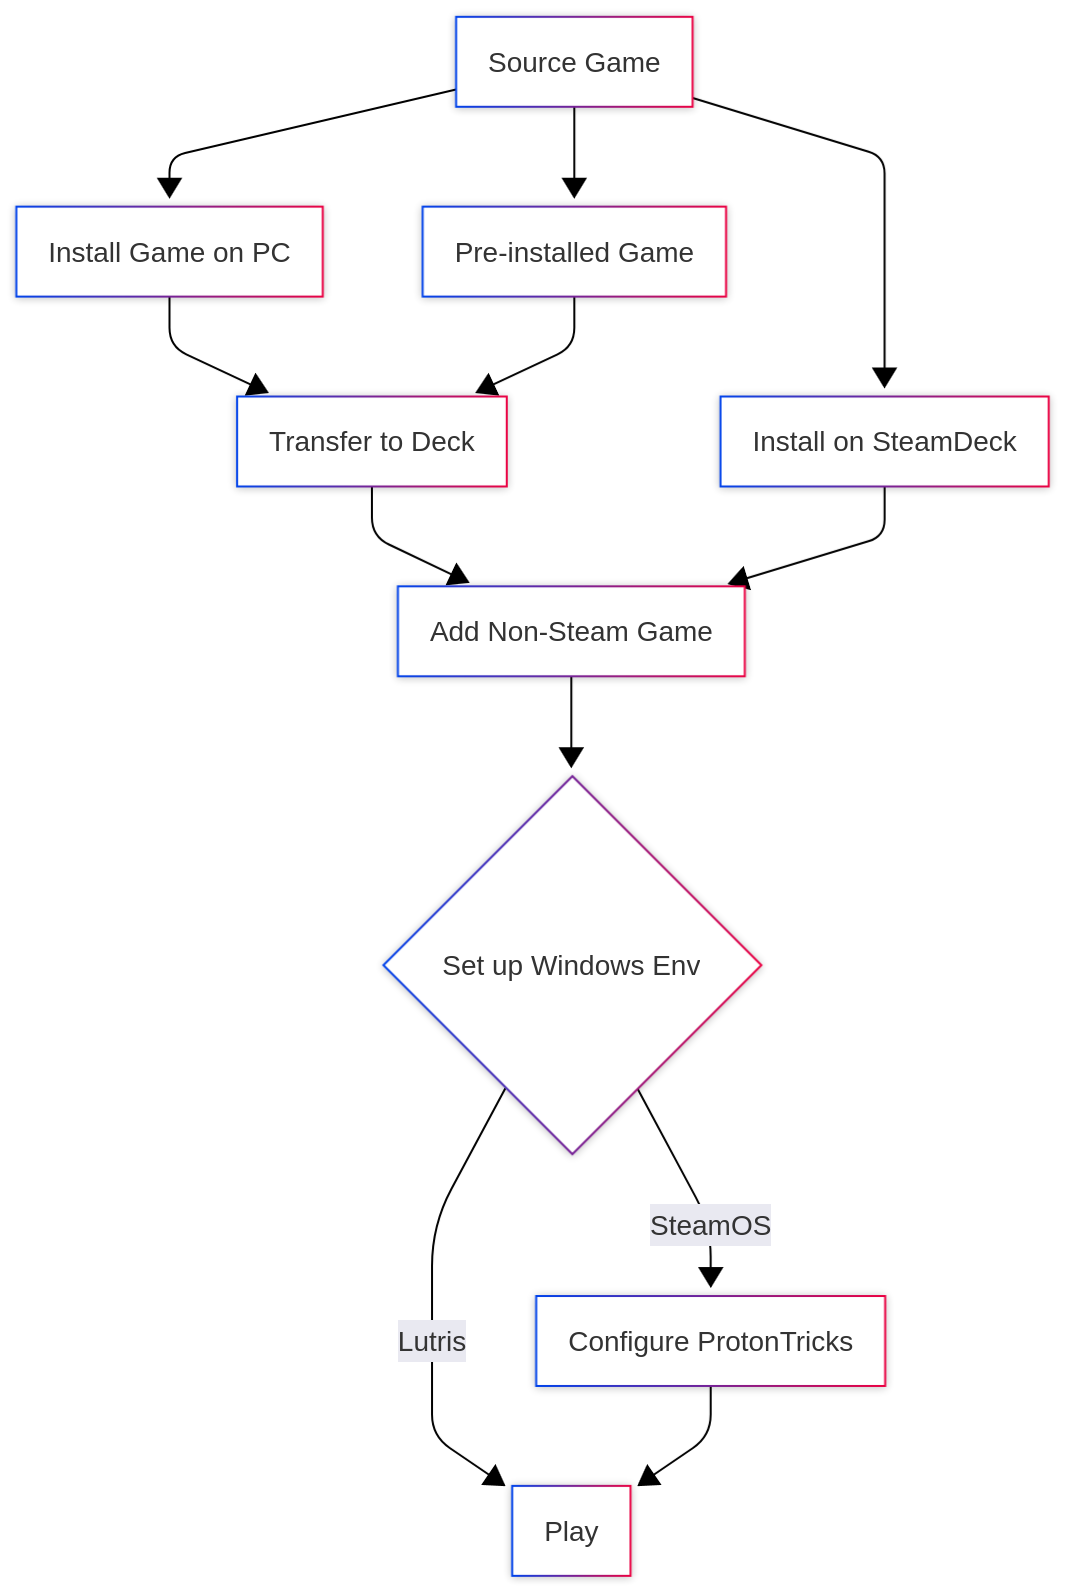
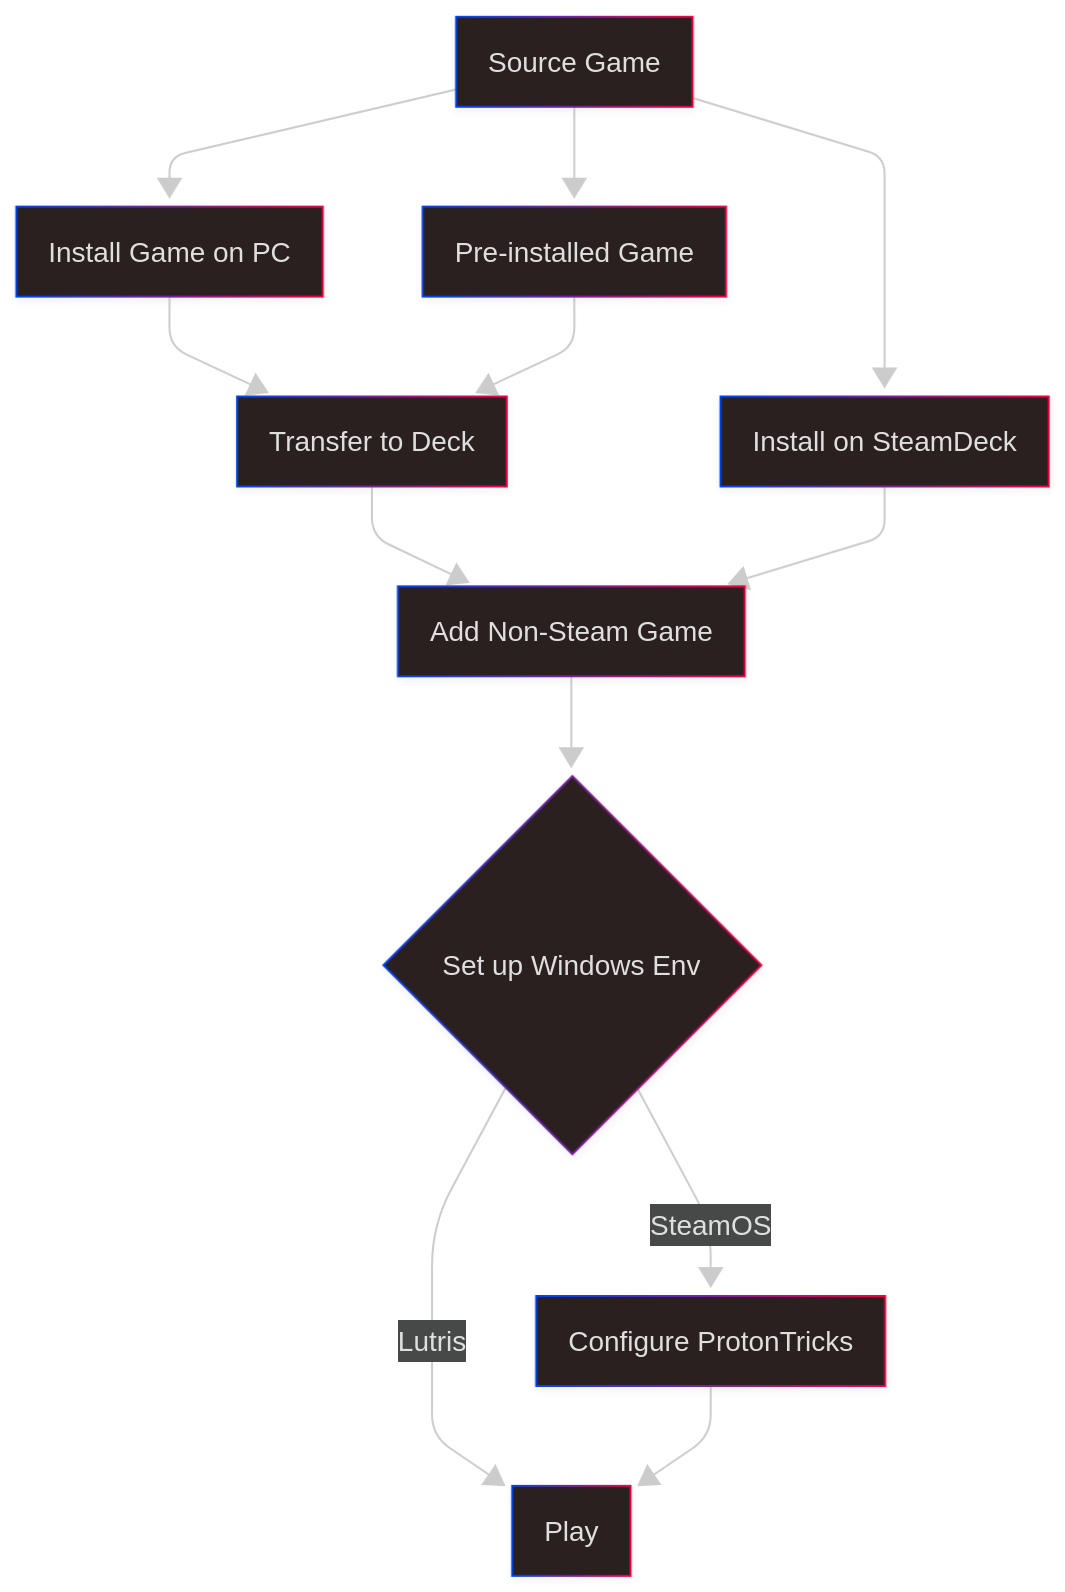
Guides for installing games
Quick links:
- Installing games through Steam
- Installing games through Lutris
- Installing games through other launchers
- Transferring Installed Games from PC
Note: The “Add Non-Steam Game” option is found in the Steam menu in Desktop Mode, not in the Deck UI or Gaming Mode. Switch to Desktop Mode to access this feature.
Installing games through Steam
Note: If the game is already fully installed (a pre‑installed repack) skip to Part 3.
Part 1: Run the installer
- Add
setup.exeto Steam (Desktop Mode). - Force the latest GE-Proton version (recommended).
Right-click the entry in your Steam Library, choose “Properties” → “Compatibility,” and check “Force the use of a specific Steam Play compatibility tool.” If that fails, try Proton Experimental. Only try other Proton versions if those do not work. - Create a
~/Gamesfolder if you don't already have one, or use your existing~/Gamesfolder if you've set one up previously. - Click Play to launch the installer.
Note: FG repacks default to the D: drive, and DoDi repacks default to the C: drive. Be sure to manually set the install location to the ~/Games folder you created earlier.
Part 2: Installing the Game
- Choose language.
- Install to your
~/Gamesfolder (created previously or in Part 1), not inside the prefix, especially for big games. - Disable bundled DirectX/VC++ unless necessary (only install these if the game specifically requires them; otherwise, skip to avoid conflicts with system versions).
- Close the installer after it has successfully finished. Once decompression is complete and the installer finishes, close the installer completely before proceeding.
Caution: Some repacks can take a long time to decompress, and the installer may appear unresponsive during this process. This is normal.
Part 3: Running the game
Before you run the game:
Launch errors are often caused by using the wrong Proton version or missing dependencies. See the Dependencies section for help installing required components.
Missing DLLs or extra components may be required for mods or other enhancements. See the Adding DLLs to Proton section for details on how to add them using ProtonTricks or Steam launch options.
Caution: Do NOT install to the C: drive or inside the Wine prefix’sdrive_cfolder. Always install your games to a separate folder like~/Gamesto prevent issues with storage, access, and future troubleshooting.
|
Tips:
- Linux does not play well with spaces in file paths. Always wrap the path in quotes, e.g.
"/home/deck/Games/My Game/game.exe".- Extract multi‑part archives first (make sure to fully extract all
.zip,.rar, or.7zparts before running the installer). See the compressed files guide below.- To install on a microSD card, create a folder named
Gameson the SD card root. Then, add its path in Part 3.- Some games may have a different
.exefile for launching. Use Dolphin File Explorer to search for other.exefiles in the game folder.- Some games require specific Proton versions. Search Reddit or protondb (Link) for recommendations, and use ProtonUp-QT to download other Proton versions if needed.
Installing games through Lutris
[!CAUTION] Make sure Lutris has access to the filesystem. This can be done through Flatseal. If your Lutris games aren’t saving, this is probably why.
[!NOTE] It’s not necessary to install a game using Lutris as described here. But for some (cracked) games it works better or as described below is necessary insofar as you need a different runner for e. g. the installation of FitGirl repacks. So if you have an already installed game, skip steps 6 to 12.
|
[!NOTE] If a game doesn’t work or has poor performance, click “Configure” on the game and tick the bottom left box “Show advanced options”. Now you can edit the game’s options, change the runner, etc.
from r/LinuxCrackSupport
Installing Games through other launchers
[!NOTE] While we highly recommend using Lutris, there may be situations where you have to use another launcher. This section has links to guides that will help with them.
Transferring Installed Games from PC
[!NOTE] There are a multitude of ways to transfer your files from any device you have over to your Deck. We won’t mention USB drives here because it is easy to do and also the longest time out of any of the options seeing as how you have to transfer twice.
[!WARNING] Speeds may vary based on a variety of things including network speed, network hardware, PC hardware, cable vs. WiFi, etc.
SSH (Network File Sharing)
Below are step-by-step guides for connecting to your Steam Deck via SSH from Linux, Mac, and Windows. Each guide assumes you have already enabled SSHD on your Steam Deck (see below).
Setting Up SSHD on Steam Deck
Enable SSH Daemon Service on your Deck:
|
from GitHub
Caution: The password set in this tutorial will be your password across all Deck operations. Remember it!!
SSH Connection Guide: Linux
Connect to Steam Deck from Linux:
|
SSH Connection Guide: Mac
Connect to Steam Deck from Mac:
|
SSH Connection Guide: Windows
Connect to Steam Deck from Windows:
|
Adding Your Deck Storage as a Drive on Your PC or Mac
Note: If you want to take this a step further and make it REALLY streamlined, add it to your device as a network drive. This will make it an accessible folder in Finder/Explorer. Just drag and drop and call it a day.
Guide: Add Steam Deck Storage as a Network Drive
|
Windows (10/11)
Warpinator (Still Network, Needs an App)
Note: Warpinator is an app available for Windows, and Linux that makes a direct tunnel between your two devices. This is by far the highest speed option outside of SSH. This method requires the application to be running on your Steam Deck and your other device at the same time.
On Your Deck
|
On Your PC
|
Transferring Files
|
Note: The instructions for Deck>PC should be the same.
You can go into settings and click Automatically accept incoming transfers if you don't want to accept every time.
Caution: If you can't find your device, go into connection settings and select your specific Network device (wifi, ethernet, etc.).
While Winpinator is often recommended, I myself had issues with it often not connecting or not finding my Deck. This was solved by using the unofficial app from the github linked above.
FTP (Slower Network Sharing, Needs an App)
Note: We will be using Filezilla here, as it is available on every OS. Any combination of FTP clients should work, as FTP is a protocol that is being utilized by all of the apps that offer it. There should be almost no difference.
|
Warning: You can add the connection to the app by clicking File>Copy Current Connection to Site Manager.
MTP (USB Sharing)
Warning: Enabling MTP file transfer on the Steam Deck requires installing Decky Loader and the DeckMTP plugin, as well as changing BIOS settings. Decky Loader is a third-party tool and may affect your system. Proceed with caution and only install from the official Decky Loader website.
|
Tips:
- Use a USB 3.2 Gen1 or better cable and port for fastest speeds.
- If you need to boot from USB or use Windows on your Deck, you may need to revert the BIOS setting back to XHCI.
Troubleshooting:
- If your PC does not recognize the Steam Deck, try another USB cable or port.
- Make sure the Steam Deck is unlocked and awake.
- If you see only a small partition or no files, ensure DRD and MTP are enabled on the Deck.
- On Linux, you may need to install or restart
mtpservices:sudo apt install mtp-tools jmtpfs.
Guides for Proton/Wine
Note: This guide will be using ProtonTricks
Finding Non-Steam Game Proton Folder
Note: This only works for games added to Steam already as a non-Steam game.
You need to enable Proton on the game and try to run it once so it can set up a prefix for it.
|
Note: Sometimes games will use eitherProgram FilesorProgram Files (x86). Check both.
Caution: In ProtonTricks, your game will show as whatever it is titled in Steam upon opening. If you never changed the name fromsetup.exethen that's what it will be named.
If you selectedC:during an install (which you shouldn't have done!), your game may be installed in one of these folders.
If you'd love to find out why that isn't a good idea, keep it installed there and see.

Installing Dependencies
What are dependencies?
Note: Dependencies are other tools/apps that software relies on to work.
These are often included in the game installers on official releases. When you add a non-steam game from a pirated package, they may include these in a separate folder, or they may not be included at all. Without them the games that were designed around these dependencies at best will work with issues, and at worst won't open at all. If you're situation is either of these, this is the section that should help.
Dependencies are needed if:
- [X] Video/audio is messed up or not working.
- [X] Error at beginning stating a certain file or app cannot be found.
- [X] The game doesn't start.
How to find what dependencies are needed for your game.
Note: In the event that a game does not come with its dependencies in the folder or you are not sure which they need, Steam actually has a database dedicated to every iteration of every game they have. Being the awesome company they are, they have a dedicated log of all things required through the history of a game's life cycle on their server. This includes everything from prices up to dependencies, updates and DLC. In this instance, we're going to show you where to go on their database to get the info you need.
Steam Database
|

Where to get dependencies.
Note: Microsoft has everything you need.
Because Microsoft has been around for ages, and they have been the main OS for many business and personal users for decades, they have to keep quite the extensive catalog of legacy software on their website. This means all dependencies should be available right there on the website itself.
Caution: If it wasn't explicitly clear in the previous note, do not download these from places other than the Microsoft site or Wine/ProtonTricks. While they may not mess your Steam Deck up due to it being Linux, it's just good practice to not download official and freely available things that can harm your system from shady places or people. Repackers issue the same stuff and probably get them from Microsoft themselves. Just save yourself the trouble.
DirectX
VC Runtime Redist
- VC Redist 2005
- VC Redist 2008
- VC Redist 2010
- VC Redist 2012
- VC Redist 2013 (Choose English)
- VC Redist - All
.NET Framework
Physx
Installing with ProtonTricks
Method 1
|
Method 2
|
[!CAUTION] This will likely show errors, that’s okay, it’s batch installing different types (including incompatible ones), the right ones will still be installed. Click through any installers that may show up.
Installing manually (with an installer, still in ProtonTricks)
[!NOTE] This method is useful for when you find a
Redistfolder or similar in the copy you downloaded. Some repackers do this. Make sure ProtonTricks has access to your drives and SD card through Flatseal.
|
Caution: If this didn't fix it, keep reading.
Adding DLLs to Proton
Note: Windows uses something called Dynamic Link Libraries (DLLs).
These are used by applications/games to bind functions to each other and work with data inside of the folder they are made in. Linux does not use DLLs so it is sometimes required to point your Wine/Proton prefix to the ones games use. This especially applies when modding a game, as a lot of mods rely on DLLs. We will discuss here how to add them.
Steam Arguments
Note: Steam arguments are entered through the game properties in theLaunch Optionsbox. These vary by the type of command, here we are going to coverWINEDLLOVERRIDES.
|
from r/SteamDeckTricks
Warning: These can also be added in Lutris by right-clicking your game, selecting Configure>Runner options and adding them in the DLL overrides section. Under Key you'll type (in this example)dinput8.dlland under Value entern,b.
ProtonTricks
Note: This method uses ProtonTricks interface to add DLL files to the prefix. This is my preferred method as I can see what is being entered, and not have to worry about typing things properly.
|
Note: You do not need to include the.dllat the end.
All items listed in here will run within the prefix.
Caution: If any of them give you a pop-up or an error, do not add these.
Guides for emulators and roms
Note: The Deck is an amazing emulator machine.
The sweet spot for performance is mostly in the Xbox/PS2 era, with the Switch being an exception for current gen. Anything before that should run flawlessly (on a per game basis). Do not expect to be emulating Xbox 360 (possible for some games) and definitely don't even for a second think about running PS4/Xbox One or later. There is a lot of info out there regarding emulation on the deck. We are going to gather the most frequently asked questions here. Here's a good conversation on the differences between the two.
Regardless of which one you use, the outcome will be the same.
Emudeck
EmuDeck is a collection of scripts that allows you to autoconfigure your Steam Deck, it creates your roms directory structure and downloads all of the needed Emulators for you along with the best configurations for each of them. EmuDeck works great with Steam Rom Manager or with EmulationStation DE.
Installing EmuDeck
|
from Emudeck wiki
RetroDeck
RetroDECK is a ES-DE Frontend powered Flatpak all-in-one game application that is still in development. Thanks to its RetroDECK Framework it builds-in a variety of software (that runs your games) like emulators and game engines in one package that is pre-configured.
Installing RetroDeck
|
from RetroDeck wiki
Switching Default Emulator (EmuDeck/RetroDeck)
You can change which emulator is used for a given system in both EmuDeck and RetroDeck. This is useful if you want to use a different core or emulator for compatibility or performance reasons. Both tools also allow you to set the emulator on a per-game basis for even more control.
Tip: If a game isn't working as expected, try switching to a different emulator/core for that system or just for that game.
EmuDeck
To change the default emulator for a system:
- Open the EmuDeck application (Desktop Mode).
- Go to the “Emulator Settings” or “Manage Emulators” section.
- Find the system you want to change (e.g., SNES, PS2, etc.).
- Select your preferred emulator/core from the dropdown or list.
- Save your changes. The new emulator will be used the next time you launch a game for that system.
To set the emulator on a per-game basis:
- Open Steam ROM Manager or EmulationStation DE (whichever frontend you use with EmuDeck).
- Locate the game you want to change.
- Edit the game’s launch configuration or metadata (look for an “Edit Game” or “Advanced” option).
- Select the desired emulator/core for that specific game.
- Save and launch. This override will apply only to that game.
[!NOTE] Some systems have multiple emulator options (e.g., RetroArch cores, standalone emulators). Not all emulators are available for every system. Per-game overrides may require using EmulationStation DE or editing config files directly.
RetroDeck
To change the default emulator for a system:
- Launch RetroDeck and open the main menu.
- Navigate to “Settings” > “Emulators”.
- Select the system you want to change.
- Choose your preferred emulator/core from the available options.
- Save and exit. The new emulator will be used for that system going forward.
To set the emulator on a per-game basis:
- In RetroDeck, find the game in your ROM list.
- Highlight the game and open its context menu (usually by pressing the menu/select button or right-clicking).
- Choose “Edit Game” or “Advanced Settings”.
- Select the emulator/core override for that game.
- Save and launch. This override will only affect the selected game.
[!TIP] Per-game overrides are useful for titles with special compatibility needs or performance issues. You can always revert to the system default if needed.
Individual emulators
Individual emulators can be installed as well. A lot of them are already on the Discover Store. While this is a perfectly viable method of setting up your emulation zone, we will not really be covering it here. The reason for this is that we want you to have the most straightforward and easy setup you can get. Also, quite frankly, if a lot of people follow the guides posted above and use the already-developed frontends we suggest, we get less questions and have an easier time supporting people. Should you choose to do things this way, you will manually have to set every emulator up, tweak them all to look right, organize the folder structure, and download so much extra stuff. By the time you’re halfway done, you’ll wonder why you didn’t do RetroDeck/EmuDeck in the beginning.
Switch Emulation
Recommended Emulators
Note: As of 2024, the two main Switch emulators were taken down by the most ruthlessly litigious playing card game companies of all time. Taken down does not mean gone, though. Nothing is ever fully erased from the internet. EVER. With that being said, we are not going to risk having this guide taken down by linking but as of now the best and most reliable iterations are to find mirrors of Yuzu or Ryujinx. Those will have been last updated before the shutdowns. As of the time this guide was written that should not affect any of the current games that are out (at least the important ones). There is a fork of Ryujinx that is being maintained by GreemDev. The Yuzu forks are Sudachi or Suyu.
Caution: All Switch emulators require prod.keys and firmware.
We will not tell you where to find those.
Switch Emulator Performance
Some games will run perfectly fine on the Deck. Some will have occasional frame dips. Some will have bad audio. Some just won’t work at all. This is the nature of emulation. The more popular games will have patches available for them. Someone has amazingly made a compatibility list.
BIOS, ROMs, and other files
Some emulators will require BIOS files to operate. These are usually found in a multitude of places. This reddit post should have you on the way to finding the right BIOS and ROMs for each emulator. Specifically the ROM Megathread. Again we will not link here for safety reasons.
PC Ports
Some of the games you want to emulate may have PC ports. Always check to see what came out for PC and if it ran better that way. For example, Scarface has way better QoL mods and patches that make it a much better experience on the deck. The real benefit of these is that you can modify the games to run better, and also there is more documentation and development for them as the files are more accessible to those modding. The biggest benefit of emulation is in most cases. you will save battery. PC ports usually have FPS mods, widescreen fixes, and a slew of other enhancements that make it a better experience overall. There are even PC ports for old N64 games like Mario 64, Perfect Dark, and so on. We highly recommend looking into these options. When you do find a PC port, be sure to go to PCGamingWiki to see what all should be added to the games to make them perform at their best.
Common questions/Things you will encounter
Cracks/DLC/Updates
Note: Since a lot of cracks and updates are made for PC, it is often recommended to do whatever patching of files is required on your PC, then to transfer the fully patched game over to your Deck. This certainly applies in situations with CreamAPI, Goldberg Steam Emulator, and any cracked game updates. If you don't have the means to do that, or you like to do things in hard mode, then here is how you'd do that.
This is not a blanket guide for all situations. This is just for the most common situations. Further tweaking may be needed depending on the game, the patch, or a plethora of other reasons.
Make sure ProtonTricks has access to your drives and SD card through Flatseal.
|
Note: Most modloaders really just modify and apply new files within the game folder. This can be done manually in most cases.
Don't forget to add DLLs through one of the methods listed in the DLLs part of this guide.
Caution: If you still have trouble and you don't own a PC, this may be the only time we recommend installing Windows on an SD card and doing the file operations there. There are not many situations where it can't be done all through the Deck.
Uninstalling a Non-Steam Game
To uninstall a game that was added as a non-Steam shortcut:
- Open Steam in Desktop Mode.
- Go to your Library and find the non-Steam game you want to remove.
- Right-click the game and select Manage > Remove non-Steam game from Library.
- Important: This only removes the shortcut from Steam. If you want to delete the actual game files, you must manually delete the game folder from your storage.
Warning: Uninstalling a non-Steam game or deleting its folder can also delete the entire prefix, including your game saves and configuration files.
Before removing anything, back up your save files and any important data.
If you delete the prefix, all data inside (including saves) will be lost and cannot be recovered.
Compressed files (.rar, .zip, .7z, etc.)
Note: A lot of games come in what are called compressed formats. These are used when a folder or file is too large and you want to shrink them down. Repackers and download sites do this so they can be downloaded faster. Sometimes they come with the file extensions listed above in parentheses, or they may come in something like.001, .002or7z01, .7z02,, etc. These can be handled using PeaZip
|
Note: This will result in double the size of your download or more taking up space on your drive.
If there were no errors in the extraction or the installation, you can delete the compressed files. If it was an installer, you may have triple the space taken up, once you are sure the game runs, delete the compressed files and the installer. Be sure to Empty your trash if you use that method.
ISO Files
Note: Some games (even after you extract them) will be in ISO format.
These are digital disc images. In Windows, opening this would be the same thing as inserting a disc for your game to install from, except it's all digital. These will have a.isoextension, and will usually be rather large in size.
In some cases, this functionality may be built into Dolphin's context menu byright-clicking>hovering over Mount/unmount iso image>clicking Mount. If that option is not present read below.
|
Install Locations
Note: When installing games on PC, common practice is for it to install to theC:drive.
This is put in place because theC:drive is usually the main drive that Windows lives and operates through. Since we are emulating the PC, theC:drive isn't really a drive at all. It's a folder inside of a prefix usually nameddrive_c. The nature of prefix is to emulate a Windows environment with the bare minimum. So when you work within this environment, it is limited. It is always recommended to install in a folder outside of the prefix that you can get a hold of easily.
The drive letters are named arbitrarily on a per-game installer basis.
Sometimes your memory card or hard drive may be underD:orF:.Z:seems to, more often than not, point to the root of SteamOS. This means you can always find both your connected drive and your main folder underZ:\run\media\
Your SD card will usually be namedmmcblk0p1.
Can’t see external HDD/SD Card/home Folder
- Can’t download/extract to to a certain folder.
- Install location only showing 7 gigabytes when there are hundreds of gigabytes free
- Lutris (or another app) can’t see my folders
Flatseal
Note: Most of the apps you are using will be installed in a package format named Flatpak. Lutris and ProtonTricks especially. These apps can be controlled by an app called FlatSeal. Here we will show you how to enable permissions for an app to see your other devices.
|
Note: This should work for any folder you want your app to see, and any app that is a flatpak.
Can’t find save files (moving between installs)
Using Shortix to Find Proton Folders
Shortix is a tool that creates user-readable symlinks for Proton game prefixes, making it much easier to find your mods, game saves, and more. Once installed, you'll have a folder with shortcuts to your Proton folders.
|
The Manual Way
|
Note: If there is no save file, check the Install Locations section above.
Backing Up Save Files
There are several ways to back up your save files. Here are the most common methods:
1. Manual Copy & Paste
|
2. Using Ludusavi
Ludusavi is an open-source tool that automatically backs up and restores save data for hundreds of games, including Steam, GOG, and emulators.
|
Tip: Ludusavi is great for regular backups and for moving saves between different systems or installs.
3. Using EmuSync (emulator saves)
EmuSync helps you automatically back up and sync your emulator save files, save states, and configuration files across devices or to cloud storage. It supports a wide range of emulators and platforms.
|
Tip: EmuSync is especially useful if you play on multiple devices or want an easy way to back up all your emulator saves at once. See the official EmuSync documentation for advanced options and troubleshooting.
[!NOTE] There is also a cool app called Shortix. Shortix creates user-readable symlinks for Proton game prefixes, making it much easier to find your mods, game saves, etc. Once installed, you’ll have a folder with shortcuts to your Proton folders. All info is in the guide. This is optional, but can make the process easier.
[!NOTE] If there is no save file, check the Install Locations section above.
Controller not working
[!WARNING] Some games will load perfectly but won’t have controller input. Prime examples are the new Spider Man games and Ghost of Tsushima. There are a few ways to solve this. Covered below:
Steam Input
In most cases you can disable Steam Input in the Game Menu and that alone should solve the issue.
In Desktop Mode:
|
Finding Community Layouts
There are also Community Layouts. These are layouts made by (you guessed it) the community on steam. These are searched through steam based on what they are named in the Steam Interface. Sometimes this yields results, but often for me it hasn’t.
A couple of people have reported being able to pinpoint the search by changing the shortcut name to the Steam URL listing number:
In Desktop mode:
|
</tr>
Game opens steam
Either your crack isn’t applied properly or you need to change the number in steamapp_id.txt to 1 in the game folder.
No licenses
If this shows it means your crack isn’t working. Make sure you copied the files over properly, and that you have pointed to all of the relevant DLLs and dependencies.
Games suddenly won’t open or close
More often than not, this is related to a plugin running in Decky. To verify this:
|
Game tries to load and immediately stops
Is Proton Enabled?
Note:
In some instances Steam may silently disable your forced Proton version for a non‑Steam shortcut.
Before doing anything else: open the shortcut's Properties and re‑enable a Proton version (start with Proton Experimental).
Are there quotes around the target path?
Note:
Paths containing spaces must be wrapped in quotes in Launch Options / Target field.
Example (GOOD):"/home/deck/Games/Tomb Raider/game.exe"
Example (BAD):/home/deck/Games/Tomb Raider/game.exe
Are dependencies installed?
Caution:
Missing DirectX / VC++ / .NET components will cause silent exits. See the Installing Dependencies section above and install what your game needs.
Mods won’t load
Warning:
Possible causes:
- Required DLL overrides not applied (see Adding DLLs to Proton).
- Using a Windows-only mod manager when a native / alternative method exists.
- Mod loader files placed in wrong prefix path.
- Incompatible Proton version (test Proton-GE or older Proton).
- Incorrect case-sensitive filenames on Linux.